ML.NET (Machine Learning for .NET) released by Microsoft is a revolutionary software development framework. If you want to use machine learning in your own applications, you no longer need to know your way around all the mathematics and implementation of transformation, classification, regression or SVM algorithms and deal with all of that, because it’s all contained in ML.NET. The tooling surrounding the framework does the rest: it has never been easier to choose the right algorithm for the specific application you need, train your own data on it, and finally use it in your own applications. With this approach, Microsoft is turning the tables: data and individual applications are center stage, rather than the implementation.
Part 1: Machine Learning finds its way into .NET with .NET Core 3
Part 2: A closer look at ML.NET APIs
To cut a long story short: an example is worth a thousand words. Let’s start with a practical demo to substantiate what we have said so far.
Here we go
To offer cross-platform developer tooling, ML.NET offers a Command Line Interface (CLI). We will learn more about it later. For the first quick example, however, we will use Visual Studio and the Model Builder Extension. The extension for Visual Studio uses CLI behind the scenes, by the way.
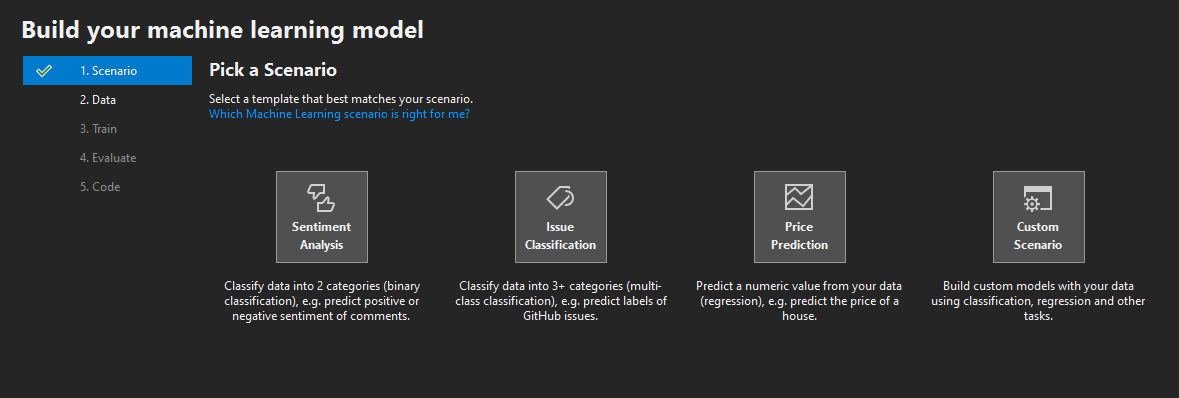
The extension can be installed via the main menu EXTENSIONS | MANAGE EXTENSIONS or alternatively downloaded from here. For this first demo, we will use Visual Studio 2019. One we’ve successfully installed it, we’ll start with a simple empty .NET Core console application. There is a new entry in the context menu of the project node in the Solution Explorer: ADD | MACHINE LEARNING. Selecting this option opens the ML.NET Model Builder as shown in Figure 1.
Figure 1: Model Builder Extension in Visual Studio
The Model Builder provides a simple wizard that takes you through five steps. First, we select the scenario, in this case SENTIMENT ANALYSIS. Step two asks for the data with which we will create and train the new machine learning model. To do this, we download the Wikipedia Detox dataset from here. The dataset contains user comments and a classification as to whether the comment contains positive or negative statements in terms of sentiment. The ML model should be trained with this data to determine if any other comment contains positive or negative statements. Once the download is complete, we select the file in the second step of the Model Builder. A small preview is displayed and the column to be forecast needs to be selected. In this example, we select the SENTIMENT column.
Then we come to step three – the training of the model. A click on the START TRAINING button is all it takes – the Model Builder immediately starts to run through a variety of ML algorithms to select the model that best suits our problem, and then proceeds to train the model. At this point, we’ll only say this much: AutoML is used behind the scenes for the algorithm selection. You should perhaps plan a little more time here than the 10 seconds specified. After 30 seconds of training, the Model Builder finds an algorithm with an accuracy of 88.24 percent. This means that the model generated was correct for 88.24 percent of all forecasts in the training phase.
Step four of the wizard then shows us a summary of the process performed, and a few key performance indicators of the model. More on this later in this article.
Finally, in step five, the final model and the corresponding code are generated as two new projects and added to the solution. The code example in Listing 1 shows how easy it is to use the model for forecasts in your own application.
var context = new MLContext();
var model = context.Model.Load(GetAbsolutePath(MODEL_FILEPATH), out DataViewSchema inputSchema);
var engine = context.Model.CreatePredictionEngine<ModelInput, ModelOutput>(model);
var input = new ModelInput()
{
  Sentiment = false,
  SentimentText = "This is not correct and very stupid."
};
var output = engine.Predict(input);
var outputAsText = output.Prediction == true ? "negative" : "positive";
Console.WriteLine($"The sentence '{input.SentimentText}' has a {outputAsText} sentiment with a probability of {output.Score}.");
If you execute the code from Listing 1 with the trained model, the output is as follows: The sentence ‘This is not correct and very stupid.’ has a negative sentiment with a probability of 0.7026196. Some of you will surely agree that integrating machine learning into your own application can’t get much easier than this. You can find a detailed description and guidelines for the optimization of generated models here.
But before we dive into the details of the algorithms, models, APIs and tooling, we’ll go through an overview of ML.NET that should provide us with the complete picture.
Learn more about ML Conference:
Overview
ML.NET was originally a project of Microsoft Research. According to Microsoft, this project has been rolled out for over a decade and has been steadily establishing itself. It has gained importance in many areas within Microsoft and has found its way into the company’s popular products (such as Windows, Power BI, Office, Defender, Outlook or Bing). ML.NET is now making its way to the general public and therefore appears in .NET Core.
Version 1.0 was released in April 2019, and version 1.1 (which includes bugfixes and performance optimizations) has been available since June. ML.NET runs on .NET Core 2.1 and requires the installation of the appropriate runtime and SDK.
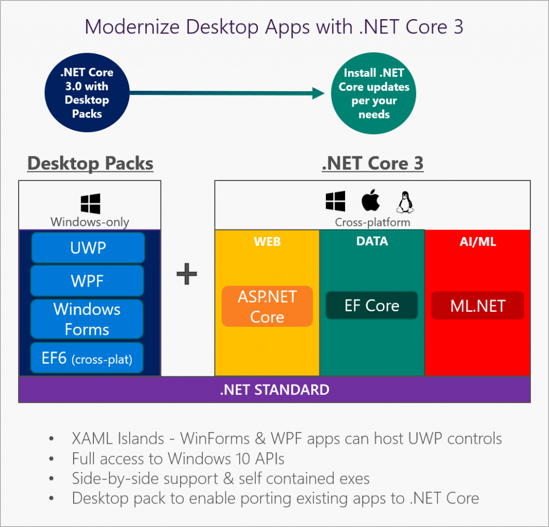
As part of .NET Core, ML.NET is being developed under the umbrella of the .NET Foundation as an open source project together with the Community on GitHub. The framework is platform independent and can be used on Windows, Linux and Mac. Figure 2 shows a Microsoft overview of .NET Core 3 and demonstrates how ML.NET fits into the ecosystem as a component.

Figure 2: ML.NET in .NET Core 3
The goal of ML.NET is to make machine learning as easy as possible for .NET developers without having to leave their familiar surroundings, i.e. the development environment and the programming language. Microsoft wants to abstract everything to the point that in-depth knowledge of machine learning will no longer be necessary. The example at the beginning of the article proves to some extent that this intention was met. Whether it’s a web, desktop or IoT application, mobile app or game, as a .NET developer we can now integrate KI/ML into any kind of application without any knowledge of ML.
We have seen that with ML.NET and the associated tooling, you can build, train, distribute and use your own ML models easily. If your own needs go beyond what ML.NET offers out of the box (such as optimization of hyperparameters, etc.), the developer is free to fall back on other tools (for example Infer.NET, TensorFlow or ONNX). This is made possible by the extensibility of ML.NET, which has been part of the concept and implementation right from the start.
Finally, a word on the performance of ML.NET. Based on a 9 GB Amazon dataset containing product ratings, Microsoft has trained an ML model that can deliver forecasts which are 93% reliable (accuracy/precision). We need to add here that only 10 percent of the data from the set was used for training. The reason for this was that other ML frameworks used for comparison could not handle more data due to memory issues. As a result of the benchmark, ML.NET achieved the highest accuracy and best speed, as shown in Figure 3. You can find out more information about the research in the paper available at arXiv.

Figure 3: Benchmark results from ML.NET and other machine learning frameworks
This should be enough for a quick overview of ML.NET at this point. Now let’s take a look at the application areas of ML.NET and the algorithms that the framework provides.
Deployment scenarios
If you check out the Microsoft.ML.Trainers namespace that originates from the Microsoft.ML.StandardTrainers dll which in turn comes with the NuGet package Microsoft.ML, you get a first impression of the variety of algorithms implemented by Microsoft. Figure 4 shows a fragment.

Figure 4: Trainer classes from the “Microsoft.ML.StandardTrainers” namespace
Since providing a full list of all the algorithms would not be expedient and would in any case go beyond the scope of this article, we’ll limit ourselves to an overview on the classes/types of supported algorithms and their deployment scenarios.
For example, if you want to recognize feelings or moods, as shown in the example of the sentiment analysis above, you can use the binary classification. In this case, binary means that all results of the forecasts are divided into two result sets. A forecast can accordingly be just one or the other. In the sentiment analysis, this would correspond to a forecast that a certain statement is meant as negative or positive. This type of ML algorithm is also used to implement spam filters, fraud detection, and prediction of illnesses.
The multi-class classification, on the other hand, is used if the forecast result can come from more than two result sets. So, these kinds of algorithms are for example used to recognize handwriting or to classify plants.
ML.NET can also be used to create models for recommendations. So, it is conceivable that you could for example recommend certain products or films to the user based on their (consumer) behavior or on the buying behavior of other customers. This is a concept that has been sufficiently recognized by e-commerce shops. Matrix factorization can be used here, for example.
Using regression algorithms, you can forecast numerical values. Regression is often used to forecast demand, price and sales figures for a product.
By applying clustering, groupings within data are found and forecast to for example divide customers and markets into specific segments. Clustering is also used for the classification of plants.
Anomaly Detection Models are used for anomaly detection. You may want to find anomalies in power and communications networks to detect a cyberattack, for example. Even the forecast of sales peaks falls into this category.
Finally, we need to mention Computer Vision. Computer Vision is used in image recognition and classification. So let’s say you want to recognize and describe objects and scenes within a visual representation. This is where the so-called Deep Learning steps in. ML.NET does not provide algorithms directly for this. For such scenarios, you would need ONNX or TensorFlow Model, for example. ML.NET understands these models and thus offers the possibility to extend them into any scenario.
ML.NET is intended for all of the above application scenarios and ML types while providing the appropriate algorithms, or giving you the option of integrating external models. Ultimately, all the doors of ML are open. Things get tricky when it comes to finding the right approach to your own particular problem. Here you need to carefully consider what the problem is exactly, what data is available and how you can optimally solve the problem. The best and fastest algorithm is of no use if it’s the wrong one for the problem at hand.
You can find a full list of all the algorithms in ML.NET along with the documentation here. To facilitate the selection of a suitable algorithm or model, Microsoft maintains a variety of practical examples on GitHub to get you started in ML. The Community also provides a set of examples here.
Command Line Interface
Now let’s go back to some practical concepts and take another look at the tooling. As I had mentioned before, the Model Builder Extension for Visual Studio uses ML.NET CLI in the backdrop to train models, etc. So let’s take a look at what this tooling offers and see how it works.
The CLI is a .NET Core Global Tool and can be installed via Powershell, on a Mac terminal or in Linux Bash using the dotnet tool install -g mlnet command [2]. The prerequisite for this is the installation of the .NET Core 2.2 SDK. Once it is installed, you can call up the tool by entering mlnet –version. The –version parameter causes the CLI to output the current version on the console.
To train an ML Model with CLI, enter the following command:
mlnet auto-train -d .\MyDataSet.csv --label-column-name ColumnToPredict --has-header --task regression.
Before you do that though, you should switch to an empty directory or the target directory. If necessary, the training data can also be copied to the target directory. In the command shown above, you can specify the training data file after the -d switch. Further parameters indicate the column to be forecast in the training data, specify whether the input file has a header and indicate which type of ML is to be used. In this case, regression was selected. By entering the mlnet auto-train –help command, you can display all the options for the auto-train operation

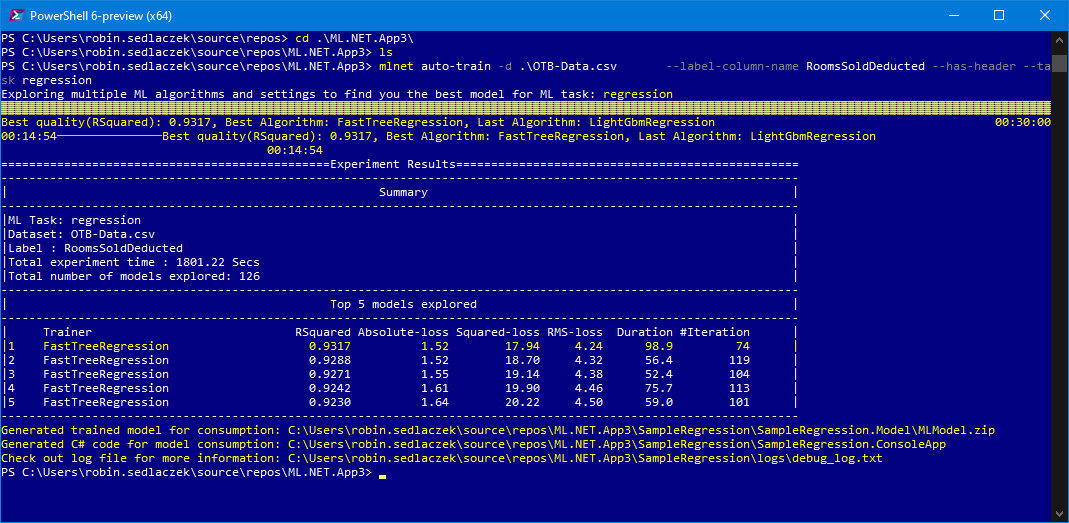
Fig. 5: AutoML with ML.NET CLI
Figure 5 shows the output of the results of a training process. During the procedure, the CLI applies an AutoML strategy to find an algorithm/model that provides the best results in terms of forecast accuracy for the given column (box: “AutoML”). The example in Figure 5 shows that the FastTreeRegression algorithm provides the most reliable results with an accuracy of 0.9317 (approximately 93 percent). The total training time was 30 minutes. Various models were evaluated. The figure shows that FastTreeRegression took each place among the Top 5 of the evaluated models.
At the end of the training process, CLI generates the code. Or specifically, two projects. The first project contains the generated binary model packed in a ZIP file, as well as two model classes. A class represents the structure of the training data that we enter and serves as an input model for forecasts. The other class represents the output of the forecast of the model for a given input. The model project is the component we can then use in our own applications to make forecasts based on the model we’re generating.
The second project generated by CLI is a console application and shows by example how the model can be used. The project also contains a class called ModelBuilder. The ModelBuilder implements methods used to train the model. This class can later be used in your own code to re-train the existing model (for example with new current training data). For this purpose, you simply call up the static method ModelBuilder. (Listing 2).
public static void CreateModel()
{
  // Load Data
  IDataView trainingDataView = mlContext.Data.LoadFromTextFile<ModelInput>(
                               path: TRAIN_DATA_FILEPATH,
                               hasHeader: true,
                               separatorChar: '\t',
                               allowQuoting: true,
                               allowSparse: false);

  // Build training pipeline
  IEstimator<ITransformer> trainingPipeline = BuildTrainingPipeline(mlContext);

  // Evaluate quality of Model
  Evaluate(mlContext, trainingDataView, trainingPipeline);

  // Train Model
  ITransformer mlModel = TrainModel(mlContext, trainingDataView, trainingPipeline);

  // Save model
  SaveModel(mlContext, mlModel, MODEL_FILEPATH, trainingDataView.Schema);
}
The method first loads the training data through an MLContext in a so-called data view. The MLContext class is a central component and starting point of all operations in ML.NET – nothing will work without context. A data view is always displayed as IDataView and represents the view of the training data for ML.NET.
Subsequently, the training pipeline is generated. Here, algorithms for the data transformation (for the normalization of column values, for example) and the training algorithm itself are appended in a pipeline. Once an evaluation is made to determine the accuracy of the model with the given training data, the model is then trained. The resulting model is displayed as ITransformer. The name Transformer comes from the fact that this object can be used to transform input data into a forecast. Finally, the model is saved to the file specified in MODEL_FILEPATH.
AutoML
AutoML stands for Automated Machine Learning and describes an end-to-end solution for finding an optimal ML model for a given problem within specific constraints (e.g. in reference to accuracy, run-time behavior, memory usage, etc.). AutoML is an object of research. But there are already some implementations out there, including one by Microsoft Research. And this very implementation from Microsoft is used in ML.NET.
What does it mean to find an ML algorithm? What exactly does AutoML do? In order to create an ML model, valid training data must first be provided. This data must be processed. This includes actions like cleaning up data, removing unnecessary and redundant data, filling in gaps in data or normalizing values. Then domain knowledge comes into play. On the basis of features, characteristics of the training data, the ML model gets to know the domain and learns to make forecasts for it. Features are fundamental to an ML model and must therefore be carefully defined. Then they need to be extracted and selected from the data. A complex task if you would want to do it manually. AutoML automatically tries to learn the features and select them. The selected features then flow into an algorithm. This must also be carefully selected. Yet AutoML does that for us, too. Finally, we have the optimization of the hyperparameters for the model. And likewise, the optimization is also automated by AutoML. You can find more information on this here. So, there’s a lot going on backstage. AutoML significantly reduces the effort for us as developers and makes general use of ML possible in the first place.
Using the model
But how can you now use the generated model in your own application to make forecasts? That is relatively easy. First of all, the model project generated by CLI is referenced in the places where it is to be used. But that isn’t an absolute necessity, because the ModelInput and ModelOutput classes have to be available, as well as the ZIP file with the ML Model. To this end, you can simply copy the class files into your own project. The model is accessed at runtime by specifying the path to the ZIP file. So, you have to make sure that the ZIP file is available at runtime. Finally, the NuGet Package Microsoft.ML is needed. You can easily install this via the NuGet Package Manager or the command line.
Let’s take the example from the beginning of the article once again – the sentiment analysis; or rather, the model created in the example. The application might thus look something like in Listing 3.
var context = new MLContext();

var model = context.Model.Load(GetAbsolutePath(MODEL_FILEPATH), out DataViewSchema inputSchema);

var engine = context.Model.CreatePredictionEngine<ModelInput, ModelOutput>(model);

var input = new ModelInput()
{
  Sentiment = false,
  SentimentText = "This is not correct and very stupid."
};

var output = engine.Predict(input);

var outputAsText = output.Prediction == true ? "negative" : "positive";

Console.WriteLine($"The sentence '{input.SentimentText}' has a {outputAsText} sentiment with a probability of {output.Score}.");
First, an instance of MLContext is generated. As I had mentioned, the MLContextclass is the pivotal point of ML.NET. Through the Model characteristic of the context, the ML model to be used is then loaded into the context. Here we use the model generated by CLI for sentiment analysis. It is referenced via the path. With the Model.CreatePredictionEngine model, you first instantiate the component that can make forecasts based on the model. To do this, the loaded model is passed as a parameter. These steps are sufficient for the preparation. The ML Model is ready to use and we can start making forecasts for inputs. Now the generated model classes are used. For input, we create an object of the ModelInput class. We want to find out if the sentence “This is not correct and very stupid” contains a positive or negative statement. The sentence is defined for the SentimentText characteristic of the ModelInput instance. Now the input is passed on to the Predict method of the forecast engine. This method sends the input through the model and generates a forecast in the form of an instance of the ModelOutputclass. Through the Prediction characteristic, we find out if the sentence contains a negative or positive statement. Moreover, through the Score characteristic, we find out how likely the forecast is. Both results are output in the console in the example above. If the model was trained with the same data as in this article, the output for the above code sample will be as follows: The sentence ‘This is not correct and very stupid.’ has a negative sentiment with a probability of 0.7026196. According to the forecast, the given sentence contains a negative statement with a 70% probability.
A closer look at the ML.NET APIs would regretfully go beyond the scope of this article. But don’t panic, because part 2 of this series will focus on the ML.NET APIs. For this reason, the example provided here should be sufficient for an introduction.
Conclusion
As we can see, with ML.NET a ML model with only a few lines of code can be used directly in your own application. It really can’t get much easier. The ML.NET CLI makes it just as easy to generate ML Models. Behind the scenes, AutoML takes care of the preparation of the training data, the identification and selection of features and the selection and optimization of the algorithm used. The Model Builder Extension additionally offers a corresponding UI attachment and integration in Visual Studio.
With ML.NET, Microsoft abstracts machine learning to the point that it is possible for every developer to extend their own applications with intelligent functions, even with no ML knowledge. If you want to know more, please refer to the detailed documentation.


